
2000 Photos In 3 Minutes
A friend sends you 2000 photos from her recent vacation. Are you are going to look at every single one? Let's be honest. Who wants to see other people's vacation photos? Nobody. Except, one thousand people wanted to see mine. What did I do to make them want to do so?
Congratulations! You just looked at 2000 photos in three minutes. Phew!
I came back from business trip to France last week and had twelve thousand photos on my hard drive. I was not going to edit them all and upload them into a giant album. But I also did not want to throw them away. I decided to make them interesting enough for my friends to want to look at them.
How can you do it?
Here is my "unconference demo" from Google+ Photographer Conference and an interview for Photo Talk Plus. Written instructions are below these two videos.
Some people pointed out that this technique is not a stop motion as it does not match the definition. Some pointed out that it's more of a time lapse. I am using both teqniques in my videos and calling it time-motion or stop-lapse isn't appealing.
There are many tools and many sites explaining how to make stop motion videos. Trey Ratcliff also put together a great screencast with instructions. You can use any tools you like, as long as you follow the steps below:
1. Take lots of very similar photos
In order to make your stop motion "flow", take tons of photos of the same thing. Use various techniques to make every image slightly different.
- Move camera slightly between every shot.
- Circle around subjects, or move the camera towards or away from the subject.
- Move your subject between every shot. If the subject is a person, let them walk towards or away from the camera. Photograph people walking, dancing, jumping, etc.
To see more techniques, check out my how to videos on stopmotionista.com.
If you travel, don't forget to photograph while you are in transport. Travel videos look better if you show the whole journey, including the airports and trains.

2. Optional: Reorder and crop
In an ideal world, you don't need to reorder the photos. Chronologic videos are great and show your journey accurately. But you will often find yourself in a situation when you need to swap some photos to make the story flow better.
Cropping might be needed if you want to create a true HD video which requires an aspect ratio of 16:9. However, if you are happy with the aspect ratio of the photos straight out of the camera (4:3 or 6:4), you can skip the cropping. YouTube will then pad your final video will black stripes on the left and right.
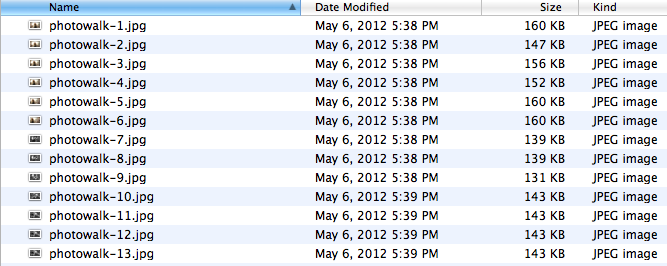
3. Save resized images with new file names
After you reorder the photos in your favorite photo editor (Lightroom, Picasa), you need to rename them so that they keep the new order after they are sorted by the file name. If you have photos from two or more cameras, synchronize them by time and then export (save) with new names containing sequence numbers. I used Adobe Lightroom to do this.
Lightroom allows me to automatically resize all images while saving them with new names. The above video was generated from photos that were 720 pixels wide. It's decent enough for viewing on a small laptop or an iPhone. For better resolution, pick 1280x720. I did however keep the original 6:4 aspect ratio and you should see black stripes on the left and right of the frame.
This is what a renamed file sequence would look like. As you can see, it sorts nicely by file name.
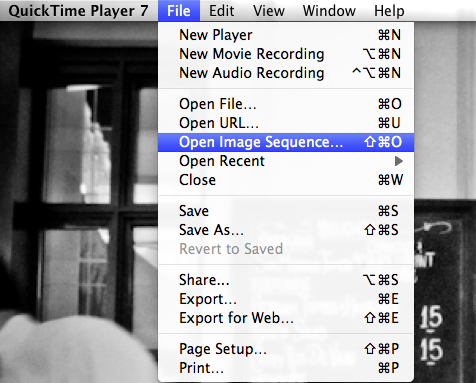
4. Convert the photo sequence into a movie file
Convert the photo sequence into a video file. I used an advanced function "Open Image Sequence" in QuickTime Player 7 do this (the license cost $30 but it's totally worth it). QuickTime will then ask you to select a frame rate. I picked 12 frames per second. After you choose the frame rate, you'll be presented with your stopmotion video. It will be silent, but it will already look cool. :) Congratulations! Pat yourself on a back, save it into a .mov file and move onto the next step!
5. Optional: Add magic
You can stop now and enjoy your silent movie or you can continue editing your video further.
The next thing you probably want to do is to add sound. Pick an upbeat song to match the fast frame rate of the video. I found this amazing song by We Like Monsters and it matched my video perfectly! You can find free tracks at jamendo.com and freemusicarchive.org.
After you select a song, you'll realize that the length of the song does not match the length of the movie. It seems like you'd need to trim one or the other. It's easier to shorten few long movie sequences in order to make the movie match the song length. I used iMovie for this job.
iMovie also lets you insert a sequence with animated globe which enhances travel videos with facts about where you traveled from and where you traveled to. Just click on the globe icon on the bottom right of your iMovie app.
6. Upload to YouTube
Upload your movie to YouTube with the highest possible resolution. It might take longer, but you wouldn't need to be frustrated with poor quality once you watch it on YouTube.
7. Tell them
Tell all your friends about your new video. While you're at it, you can also share this blog post with them to show them how you did it. Trust me, they'll be asking.
Make sure to check out my main stopmotion site stopmotionista.com and if you feel crafty, also check out my "HOW TO" series to learn how to make other creative things.
And don't forget to send me links to your creations. I can't wait to see them!
Petra
 Petra Cross


